Video Encoding Your First Video Encoding Request
Don't have a Venc Service yet? Click Here!
There are a few requirements in order to make your first video encoding request, these are:
- Service ID: This can be found inside your service page on the SlashedCloud dashboard.
- Service Secret Key: This can be found inside your service page on the SlashedCloud dashboard.
- API Endpoint:
https://venc.slashed.cloud - Source: The path of your video source.
- Destination: The path of your video destination.
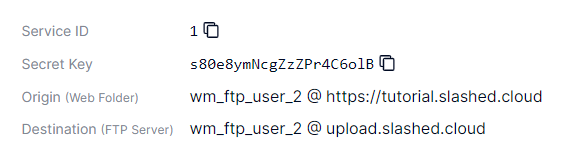
Example of what you see in your service page.
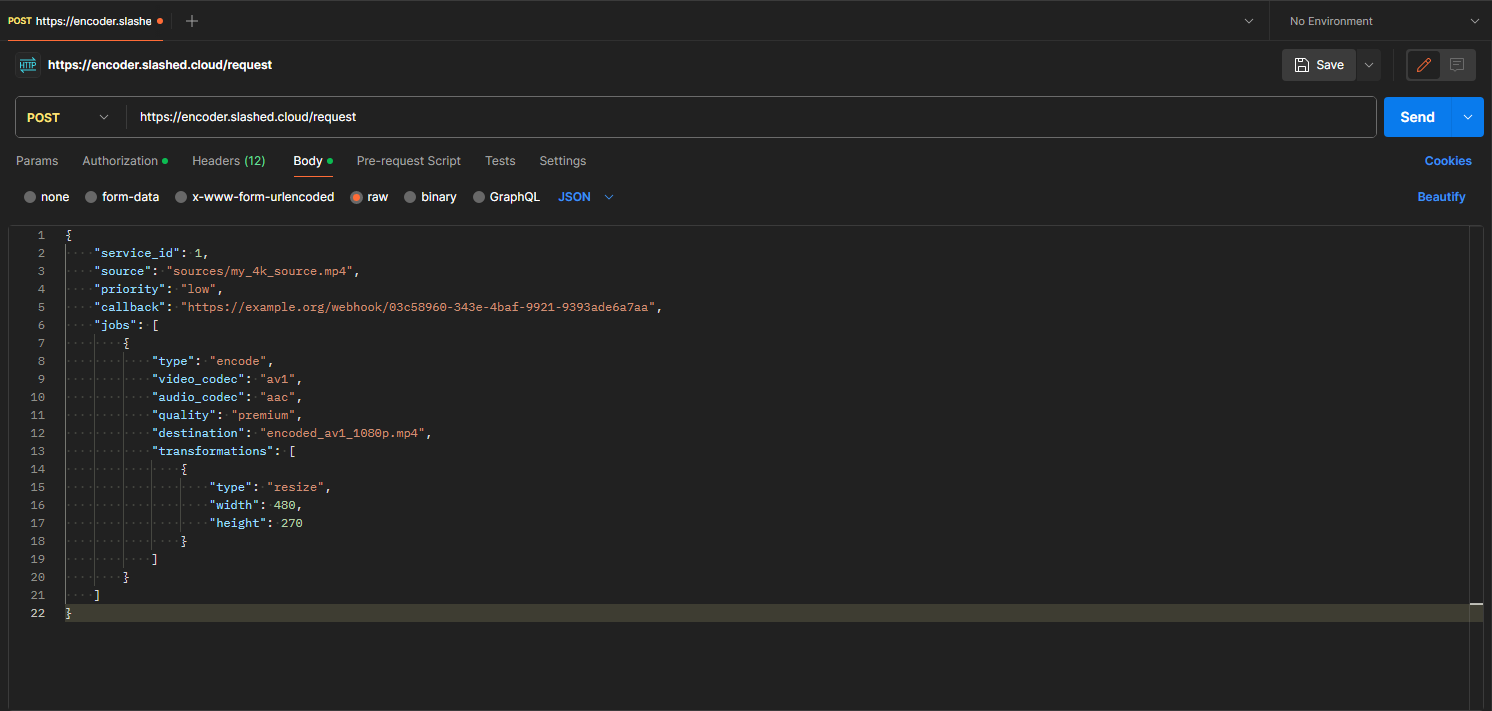
What does a video encoding request look like?
Parameters
service_id : number Your service ID, which is a unique identifier for the service you are using. It's essential to include this in your request so that the server knows which service you are accessing.
source : string The source file that you want to encode. The source file must be in the storage that you have set up.
priority : string Specifies the priority of the request. The priority can be either 'low' or 'high'.
callback : string This is the callback URL. After the server processes your batch request and completes the specified encodings, it will send the response back to this URL.
jobs : array An array of jobs to be applied to the source file - In this example we have an encoding job. In every object we must specify the type of job we are going to apply.
		{
  "service_id": 1,
  "source": "sources/my_4k_source.mp4",
  "priority": "low",
  "callback": "https://example.org/webhook/03c58960-343e-4baf-9921-9393ade6a7aa",
  "jobs": [
    {
      "type": "encode",
      "video_codec": "av1",
      "audio_codec": "aac",
      "quality": "premium",
      "destination": "encoded_av1_1080p.mp4",
      "transformations": [
        {
          "type": "resize",
          "width": 480,
          "height": 270
        }
      ]
    }
  ]
}
1.1 Jobs
Each job has its own parameters. Below are the parameters for each job type.
1.1.1 Encode Job Parameters
Encoding refers to the process of converting a source video file into a different format or compression scheme suitable for various playback devices and platforms.
type : 'encode'
video_codec : string Video codec must be one of: 'h264', 'h265' or 'av1'.
audio_codec : string We only support the aac codec at the moment.
destination : string Name of the output file.
Note:
We currently only encode to the MPEG-4 container, using the
".mp4" file extension. We are working on supporting more formats
in the near future.
quality : string Video quality can be either 'standard', 'optimal' or 'premium'. Defaults to 'standard'.
fps : number Number between 0 and 60. Can have up to 2 decimals. Defaults to original fps.
transformations : array of transformations Array of transformations to apply to the video before the job. See the transformations section for more details.
		{
  "type": "encode",
  "video_codec": "av1",
  "audio_codec": "aac",
  "destination": "encoded_av1_1080p.mp4",
  "quality": "premium"
}
1.1.2 PreviewClip Job
Designed to generate a concise preview clip based on a given video. This functionality is particularly useful for creating teasers or highlights from longer video content. Automatically extracts a one second clip every 30 seconds.
type : 'preview_clip'
destination : string Name of the output file.
Note:
We currently only encode to the MPEG-4 container, using the
".mp4" file extension. We are working on supporting more formats
in the near future.
num_snippets : number Sets the amount of snippets to extract from the video. Default is 5.
snippet_duration : number Sets the duration of each snippet in seconds. Default is 1.
video_codec : string Sets the video codec for the output file. If not set, the codec of the input file is used.
transformations : array of transformations Array of transformations to apply to the video before the job. See the transformations section for more details.
		{
  "type": "preview_clip",
  "destination": "/mydirectory/preview1.mp4",
  "num_snippets": 5,
  "snippet_duration": 1,
  "video_codec": "h264"
}
1.1.3 Storyboard Job
Generates a storyboard by capturing screenshots from a video, creating an image story similar to the functionality seen on platforms like YouTube, where hovering over the player seekbar displays thumbnails of key moments in the video.
type : 'storyboard'
destination_dir : string Sets the name of the output directory.
sprite_file : string Sets the name of the output sprite file. Must end in '.jpg'.
vtt_file : string Sets the name of the output VTT file. Must end in '.vtt'.
interval : number Sets the interval in seconds between each screenshot. Default is 10.
sprite_columns : number Sets the amount of columns in the sprite file. Default is 10.
enhance : boolean Sets whether to enhance the screenshot quality. Default is false.
extra_formats : array of strings ('webp' | 'avif') Optional array containing 1 to 2 unique values from 'webp' and/or 'avif', specifying additional output formats.
transformations : array of transformations Array of transformations to apply to the video before the job. See the transformations section for more details.
		{
  "type": "storyboard",
  "destination_dir": "/mydirectory/storyboard1/",
  "sprite_file": "storyboard.jpg",
  "vtt_file": "vtt.vtt",
  "interval": 10,
  "sprite_columns": 10,
  "enhance": true
}
1.1.4 Screenshots Job
Enables the extraction of multiple screenshots from a video, allowing for easy creation of previews or thumbnails. This feature is valuable for platforms requiring visual representations of video content.
type : 'screenshots'
quantity : number Number of desired screenshots.
destination : string Sets the name of the output file. The %d is a mandatory placeholder ONLY if the number of screenshots is higher than 1 for the screenshot number. Must end in '.jpg'.
enhance : boolean Sets whether to enhance the screenshot quality. Default is false.
classify : boolean Sets whether to classify the screenshot content as SFW or NSFW. Default is false.
extra_formats : array of strings ('webp' | 'avif') Optional array containing 1 to 2 unique values from 'webp' and/or 'avif', specifying additional output formats.
transformations : array of transformations Array of transformations to apply to the video before the job. See the transformations section for more details.
		{
  "type": "screenshots",
  "quantity": 5,
  "destination": "/mydirectory/original/test_%d.jpg",
  "enhance": true,
  "classify": true,
  "extra_formats": [
    "webp",
    "avif"
  ]
}
		{
  "type": "screenshots",
  "quantity": 1,
  "destination": "/mydirectory/original/test.jpg",
  "enhance": true,
  "classify": true,
  "extra_formats": [
    "webp",
    "avif"
  ]
}
1.1.5 Transformations Parameters
Each job can have its own transformation parameters applied before the job. Below are the parameters for each transformation type.
1.1.5.1 Resize Transformation
Allows for adjusting the dimensions of a video, either by specifying absolute pixel values or by using percentages of the source video's width or height. This transformation is useful for resizing videos to fit specific display requirements or aspect ratios. Does NOT crop or stretch the video.
type : 'resize'
width : string | number Possible values:
Pixels: 100, "100"
or "100px"
Percentage of the source video's width: "100%"
Percentage of the source video's height: "100h"
Note: If there are transformations then the "source" is considered to be
the result of the last transformation before this step
Width Parameter with Percentage (%): Only one of 'width' or 'height' is required.
height : string | number Possible values:
Pixels: 100, "100"
or "100px"
Percentage of the source video's height: "100%"
Percentage of the source video's width: "100w"
Note: If there are transformations then the "source" is considered to be
the result of the last transformation before this step
Height Parameter with Percentage (%): Only one of 'width' or 'height' is required.
upscale : boolean Whether to upscale the video if the dimensions are larger than the source video. Defaults to false.
		{
  "type": "resize",
  "width": 480,
  "height": 270
}
1.1.5.2 Trim Transformation
Enables precise cutting of video content by specifying the start time and duration of the desired segment. This transformation is valuable for removing unwanted sections from videos, creating clips, or focusing on specific segments of interest.
type : 'trim'
start_time : number The start time of the trimmed video in seconds. Must be a positive number. If not set, the video will start from the beginning.
duration : number The duration of the trimmed video in seconds. Must be a positive number. If not set, the video will be trimmed to the end.
		{
  "type": "trim",
  "start_time": 20,
  "duration": 15
}
1.1.5.3 Crop Transformation
Allows for the removal of unwanted sections of a video by specifying the desired width and height of the cropped area. This transformation is useful for focusing on specific segments of interest or for adjusting the aspect ratio of a video.
type : 'crop'
width : string | number Possible values:
Pixels: 100, "100"
or "100px"
Percentage of the source video's width: "100%"
Percentage of the source video's height: "100h"
Width Parameter with Percentage (%): Only one of 'width' or 'height' is required.
height : string | number Possible values:
Pixels: 100, "100"
or "100px"
Percentage of the source video's height: "100%"
Percentage of the source video's width: "100w"
Note: If there are transformations then the "source" is considered to be
the result of the last transformation before this step
Height Parameter with Percentage (%): Only one of 'width' or 'height' is required.
gravity : string The gravity. Must be one of 'center', 'north', 'northeast', 'east', 'southeast', 'south', 'southwest', 'west', 'northwest'. Defaults to 'center'.
xoffset : string | number Can be a negative value. Possible values:
Pixels: 100, "100"
or "100px"
Percentage: "100%"
Width Parameter with Percentage (%): Only one of 'width' or 'height' is required.
yoffset : string | number Can be a negative value. Possible values:
Pixels: 100, "100"
or "100px"
Percentage: "100%"
Height Parameter with Percentage (%): Only one of 'width' or 'height' is required.
		{
  "type": "crop",
  "width": 750,
  "height": 500,
  "gravity": "center",
  "yoffset": 300,
  "xoffset": 500
}
1.1.5.4 Watermark Transformation
Allows for the addition of a watermark to a video, providing a way to brand content or protect against unauthorized use. This transformation is valuable for platforms requiring visual representations of video content.
type : 'watermark'
Source : string Sets the source of the watermark.
width : string | number Possible values:
Pixels: 100, "100"
or "100px"
Percentage of the source video's width: "100%"
Percentage of the source video's height: "100h"
Width Parameter with Percentage (%): Only one of 'width' or 'height' is required.
height : string | number Possible values:
Pixels: 100, "100"
or "100px"
Percentage of the source video's height: "100%"
Percentage of the source video's width: "100w"
Note: If there are transformations then the "source" is considered to be
the result of the last transformation before this step
Height Parameter with Percentage (%): Only one of 'width' or 'height' is required.
gravity : string Sets the gravity. Must be one of 'center', 'north', 'northeast', 'east', 'southeast', 'south', 'southwest', 'west', 'northwest'. Defaults to 'southeast'.
xoffset : string | number Can be a negative value. Possible values:
Pixels: 100, "100"
or "100px"
Percentage: "100%"
Width Parameter with Percentage (%): Only one of 'width' or 'height' is required.
yoffset : string | number Can be a negative value. Possible values:
Pixels: 100, "100"
or "100px"
Percentage: "100%"
Height Parameter with Percentage (%): Only one of 'width' or 'height' is required.
opacity : number Sets the opacity. Must be a number between 0 and 1. Defaults to 1.
		{
  "type": "watermark",
  "source": "source/watermark.png",
  "width": 750,
  "height": 500,
  "gravity": "center"
}
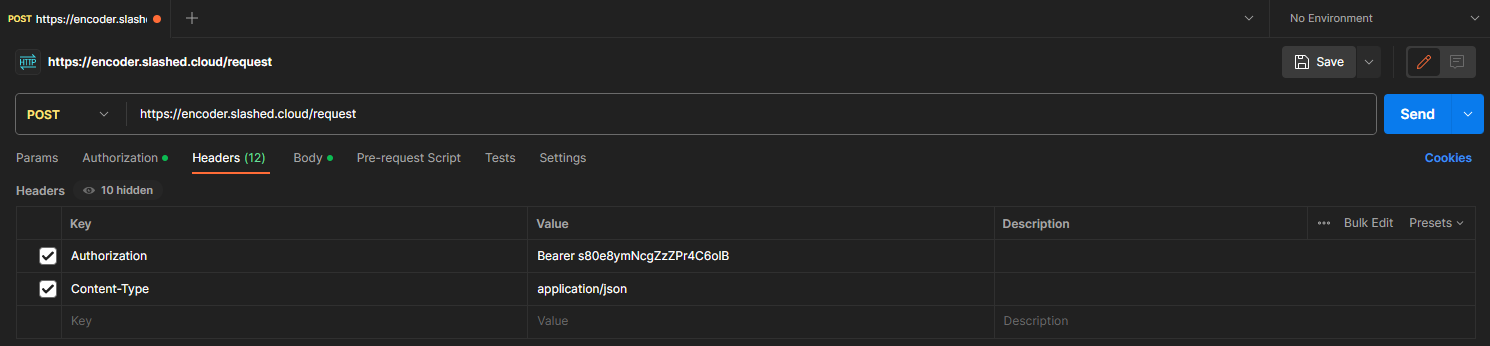
How to send a video encoding request?
Head over to Postman:
- Method: Set the Method to
POST. - API URL: Set the URL to
https://venc.slashed.cloud - Go to Body and select
rawandJSON. - Copy and paste the JSON request above into the body.
Note: Please make sure you insert YOUR service ID, source and destination. - Go to Headers and add the following:
Authorization: Bearer YourSecretKey
Content-Type: application/json - Click
Sendand you should get a response back with the status of your request.